Disabling Heat on a VAV for Summer
During the Summer, you might want to make sure that your heat is disabled on VAVs so that you don’t waste energy. This is especially true if you have electric heat strips as opposed to hot water coils, because you won’t have hot water when your boilers are off anyway.
VAV-B
With VAV-B controllers, there are a few things you can do in the Utility Program to prevent heat from coming on too fast. They are located under the Tune Control Loops button (pictured below).
This is what you will see if you choose the Parallel Fan application. First of all, in the top right are the Space Temp Errors that cause the Fan (parallel) and stages of Electric Heat to activate. Space Temp Error is Space Temp minus Setpoint. Example: 75-72=3 and a positive number means cooling is needed. Heat is needed when the error is negative, so you can increase the negative numbers: change -1 to -2. If you make changes, you must Save Changes to the VAV.
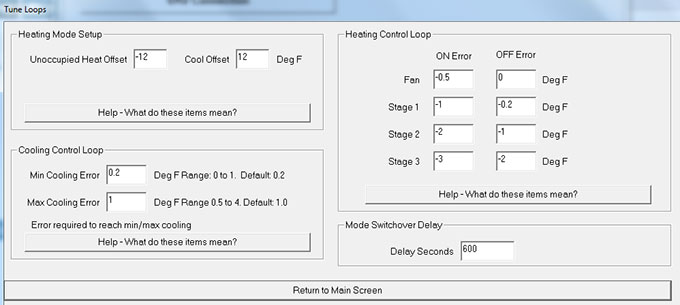
In the bottom left of Tune Control Loops is the Cooling Control Loop. By default, the VAV-B will go into Minimum Cooling at 0.2 Space Error and use the Minimum Cool CFM setting. The Damper will begin to close because of the lower CFM requirement. If you find that you are overshooting the setpoint and overcooling the space, then try increasing the Min Cooling Error to 0.5 or more. This way it will go to Minimum Cooling CFM sooner as it approaches the setpoint, possibly preventing overcooling which will prevent it from going into Heat Mode. Another way to prevent overcooling is to integrate the cooling on the AHU by increasing the supply temp if the majority of the VAV dampers are closed so that not as much cold air is needed. Logic on the AHU would need to monitor the VAV.
Another thing you can do is to lower the Min Cooling CFM setting on the Installer screen of the VAV-B Utility. This will close the damper more as it approaches setpoint and also should prevent overcooling. I have seen where some facility managers will set their Min CFM to 0. When this happens, there is no chance of overcooling, but this also results in no fresh air being introduced to the space which causes CO2 levels to rise. Don’t forget to Save Changes to VAV after making changes on any of the screens. Of course, when you exit the Utility program, it should remind you that you haven’t saved changes.
Back in Tune Control Loops, below the Heat Control Loop is the Mode Switchover Delay. You can set this up to 600 seconds, or 10 minutes. Save Changes to the VAV. Adding the delay may be just what you need to prevent from switching into Heat mode. Before switching to Heat Mode, it will stay in deadband while counting down. While in deadband, your CFM setpoint should be still in Min Cooling so the damper should be mostly closed, preventing overcooling. With the first stage of heat starting at -1.0 degrees Space Temp Error, staying in deadband for 5 or more minutes should allow the space to warm up and go back into Cool Mode before getting to Heat Mode. There will also be a delay when going back to cooling.
Disabling the Heat Mode in the controller may be the best solution. Heat Loop Disable (BD56) is a point that can be programmed in CBAS and commanded at the beginning of Summer. As Cooling Mode approaches setpoint, it will go to Min Cooling CFM Setpoint and should prevent from going into Heat Mode. If the VAV-B does go into Heat Mode, the Fan and stages of Heat will be locked out. When it warms up in the space, Box Mode will switch back to Cool and the damper will begin to open. If power goes out to the controller, or if it reboots for some other reason, you need to command the Heat Loop Disable again because it is released when the controller reboots. So if you are using Logic to command the point, set up the logic to evaluate every 2 minutes or more. If the Logic evaluates every 15 seconds, then you are creating a lot of unneeded traffic on the communication channel. You could set up a Summer Winter point based on outside air temp. Then on the Heat Loop Disable point, write Logic that looks at the Summer\Winter point and commands itself to Disable Heat when in Summer and Enable when in Winter.
Space Temp Error in CBAS is OPTO point ADF 19 if you want to see it.
UNI-B
If you feel that none of the above are going to solve your heat lockout challenge, then it is suggested that you use a UNI-B controller for your VAVs. This is done in many places and is also suggested to be used if you have a situation that doesn’t fit neatly into one of the Applications provided with the VAV-B. In the UNI-B, your application is only limited by the points available in the controller and your ability to program the sequence of operation in CBAS. Once programmed, the programming downloads to the controller.
We have a template database that comes with CBAS. In older versions of CBAS, the controllers are VAVs, which were replaced by the UNI-B. The VAVs can be converted to UNI-Bs by going to the Program screen of the controller and changing the controller type. Then you can make a template from the UNI-B controller that suits your application needs. From there you can make any changes you need to make and create a new template. In CBAS17, the VAVs in the Template Database have been converted to UNI-Bs and the Templates folder has been populated with the same UNI-B templates so they are ready to go. If your installation doesn’t have this, you are welcome to email techsupport@computrols.com or call 504-529-1413 and ask for Tech Support.
It is very easy to lock out heat on a UNI-B. You can command the Heat stage and Fan points to OFF by Operator and command the HW Valve to 0.0%. You can also command the Heat CFM point to 0 CFM which will close the damper when going into heat. These solutions will require you to change them back as winter approaches or you can write logic to do these things and Auto when in Winter Mode.
Did you know?
Did you ever notice In Utility Program, Live Controller Data, that there appears to be 3 Setpoints? Setpoint Actual, Heat, and Cool. Notice that they are the same number? They are the same as long as the VAV is in Occupied Mode because there is only one Setpoint. If you command the VAV to Unoccupied, the Heat and Cool setpoints will change and become 24 degrees different. This relates to the previous picture of Tune Control Loops. In the top left, you will see the Unoccupied Heat and Cool offsets. By default, the Heat offset is -12 and Cool offset is 12. So if the box is commanded to Unoccupied, the offset is subtracted or added to the Heat or Cool setpoint respectively. This will make the VAV attempt to heat or cool the space if it gets too hot or cool during the night or weekend. If you think 12 degrees is too much, you can change these offsets and close Tune Control Loops then Save Changes to the Controller.
